


Apple steadily transitions its machines to Apple silicon. The performance of these chips is impressive as we discussed in our previous article, and for rare cases of software incompatibility, there’s Rosetta.
But what if you need to run Linux on an M-series mac? For instance, you work with containers, and Docker lacks certain features on Apple Silicon. Another incentive would be to use novel features such as Coordinated Restore at Checkpoint (CRaC) API with new Spring Boot to slash startup and warmup times of Java applications from seconds to milliseconds — right now, this tool works with Linux only.
Rosetta won’t help in those cases, so you need to find a way to install a Linux distro. In this article, I’ll go through the options of running foreign OSs on Apple silicon and provide a step-by-step guide to installing a Linux distro on M1 mac.
Table of Contents
How to run Linux on a mac with Apple silicon?
What are the options of installing and running Linux on ARM-based macs? It would be perfect if we could run Linux on Apple silicon natively, and the process is on-going. There’s, for instance, a community-based Asahi Linux aimed at porting Linux to M-series macs, so we may see some inspiring results in the future.
Meanwhile, the developers have two viable solutions for coupling Linux with Apple silicon, namely, virtual machines and emulators.
Virtualization
The most convenient way to utilize software in a foreign environment is by means of virtualization. Virtualization tools use Apple’s hardware support to divide hardware resources into several parts, enabling multiple virtual machines (VMs) to run on one physical computer. Software running in these VMs, including the OS, utilizes them as if they were real computers.
Virtualization is a resource-efficient and performant way of running ARM-based Linux on Apple silicon. But it is unsuitable for x86_64 distributions, and, in addition, you need an out-of-the-box solution for setting up a VM on M-based macs.
Emulation
Another option of running Linux on Apple silicon is through emulation. Contrary to virtualization, emulation tools such as QEMU do not partition the physical resources, but mimic the entire hardware by processing each instruction programmatically. As a result, your selected distro (for ARM or x86_64) “believes” it is running in a native environment.
However, emulation has several cons. Due to the fact that emulators act as translators for foreign software, it is very resource-expensive and may affect the performance.
An overview of virtual machines for M-series macs
First thing first: you don’t have to use third-party virtualization solutions because you can build a VM yourself using Xcode and Swift. If you don’t want to go to that trouble, consider ready frameworks described below.
Parallels
Parallels Desktop is a virtualization solution powered by Windows and aimed primarily at seamlessly running Windows on macs (including M-series chips). However, you can also install a Linux distribution through Parallels. The tool offers a convenient user-friendly interface and enables a simple installation of a foreign OS on Apple Silicon with just a few clicks.
Note the Parallel Desktop is commercial software (with a no-charge trial period of 14 days) with enterprise-grade support, so if you need a virtual machine for personal use, you may want to consider other free options.
VMware Fusion
VMware Fusion is a desktop hypervisor developed by VMware to run foreign OSs or other tools such as Kubernetes in virtual machines on Apple Silicon or Intel macs. You can create multiple virtual machines on your mac and even play 3D games in the Linux VM as Fusion provides 3D hardware acceleration via OpenGL 4.3.
The VMware Fusion Pro (available with commercial license) version includes additional features, such as connecting to remote vSphere/ESXi servers or simulating virtual networks. If you don’t need these capabilities, you can download and use VMware Fusion Player for free after registering for a personal use license.
UTM
UTM is an open-source solution created specifically for macOS. It enables the developers to run ARM64-based systems on M-series macs at near native speed using Apple hypervisor. In addition, you can run x86_64 OSs on Apple Silicon or ARM64 systems on Intel-based macs via emulation. UTM has a nice GUI and is easy to install and use. And if you wish, you can experiment with other emulated processors provided by UTM, including the novel RISC-V.
UTM is free to use, but there’s also a paid version of UTM in the App Store. The only difference from the free package is automatic updates.
VirtualBox
VirtualBox developed by Oracle is an open-source virtualization tool free for noncommercial use. VirtualBox Enterprise Edition for businesses is also available.
The solution is targeted to x86 and AMD64/Intel64 platforms. There’s a VirtualBox 7 package for M-series macs, but the problem is that this build is in beta-mode and will remain so. The Oracle’s support team stated that “There won't be any further M1 packages on the 7.0 branch as we don't backport any significant fixes/enhancements for ARM there.” You can download the testbuilds here.
If performance and stable operation are critical to you, VirtualBox may not be the best choice in this case.
Installing Linux VM on an Apple silicon mac with UTM
How to select a Linux distribution
First of all, download the ISO bundle of a preferred Linux distribution. Note that not all Linux distros work with Apple Silicon, the reason being the difference between page sizes. M-series macs are compatible with pages of 4kb and 16 kb only. For instance, RHEL 8.x can’t be installed on Apple Silicon, although it has an ARM64 build. Therefore, verify that Linux is compatible with your mac before downloading it.
I’d recommend creating two virtual machines, one for Linux Desktop and another for Linux Server. A VM with Linux Desktop provides the familiar GUI, but takes up more space on disk, and a Linux Server VM is most suitable for corporate workflow.
For instance, you can take Ubuntu, the most popular distro, for desktop use and lightweight Alpine for server workflow. Alpine contains only the most essential packages (others can be easily pulled from the repository) and is based on musl libc, so it takes only a few Mb on disc.
Consequently, you need to download two packages to follow this guide step-by-step (alternatively, create one VM fitting your purposes):
- The latest LTS version of Ubuntu Desktop, 64-bit ARM (ARMv8/AArch64),
- Alpine Linux Virtual for aarch64, which is similar to the Standard version, but even smaller and optimized for VMs.
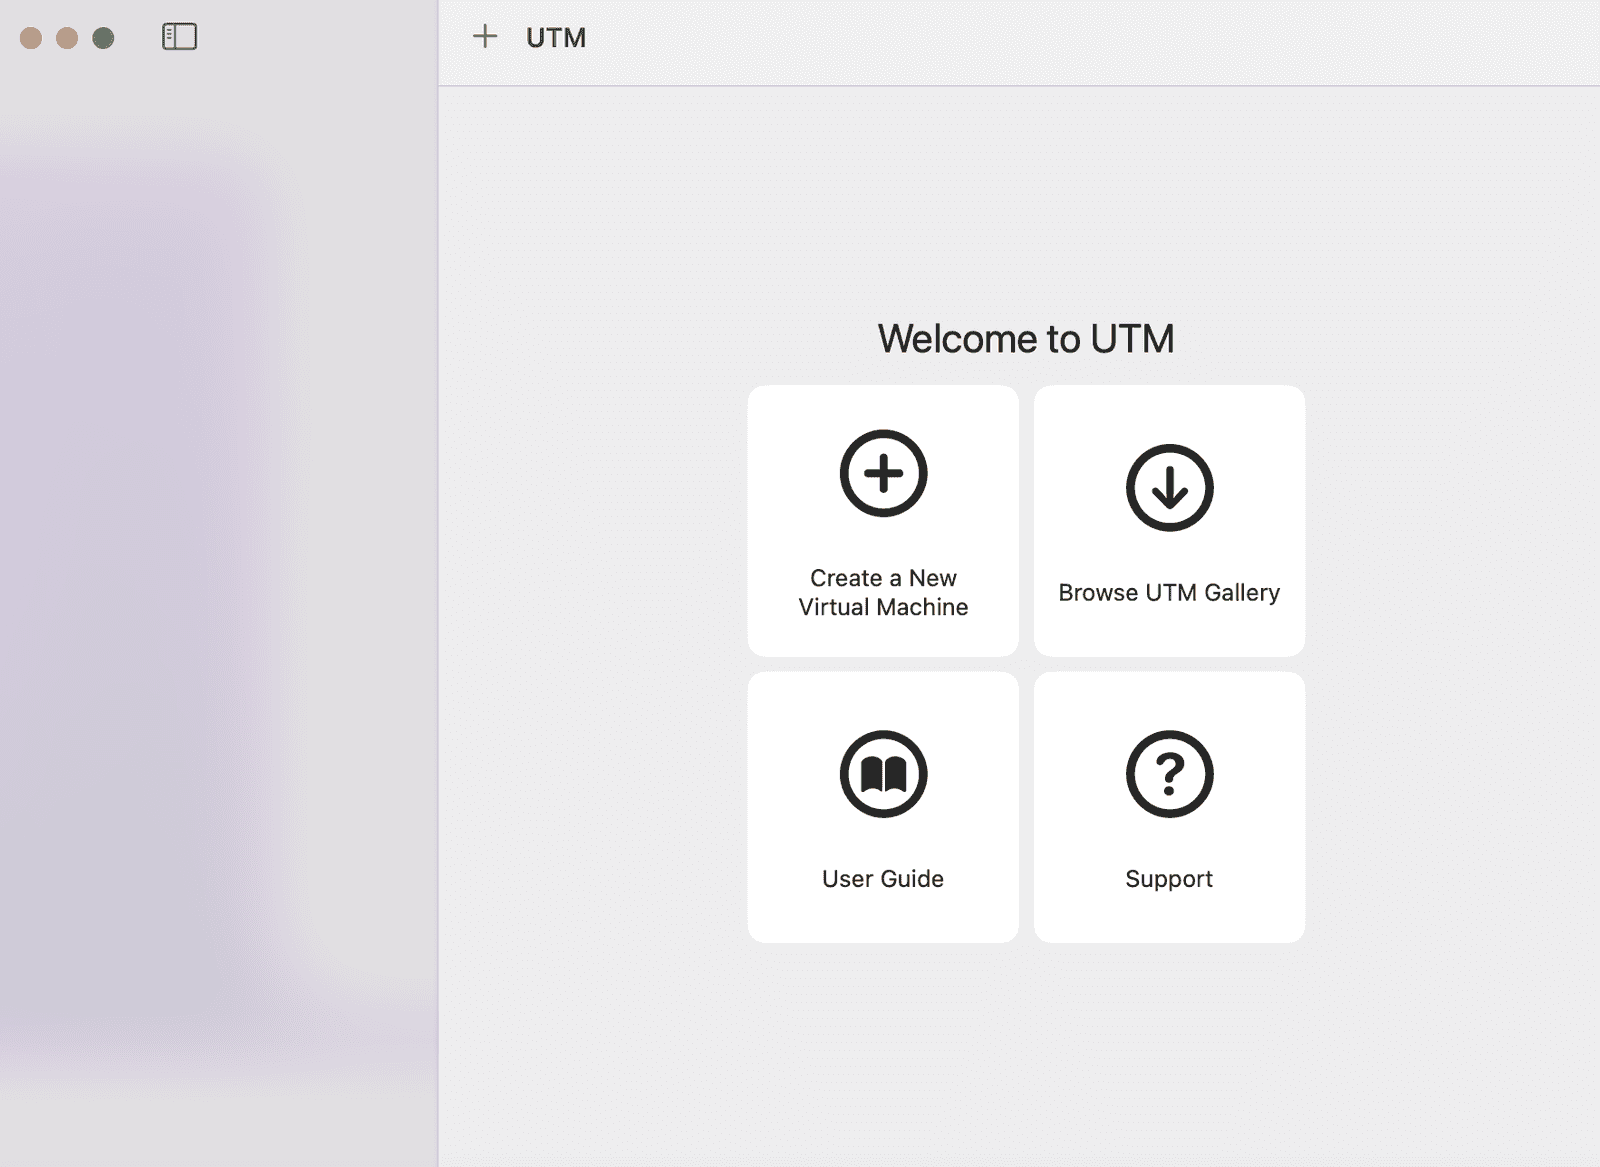
Now, download UTM. You can get the package from the site or App Store. In the latter case, you’ll have to buy it.
Install UTM like any other software and open the application.
Starting with UTM
Install Ubuntu Desktop
Click Create a New Virtual Machine. After that, choose Virtualize, and then select Linux. The following window will appear.
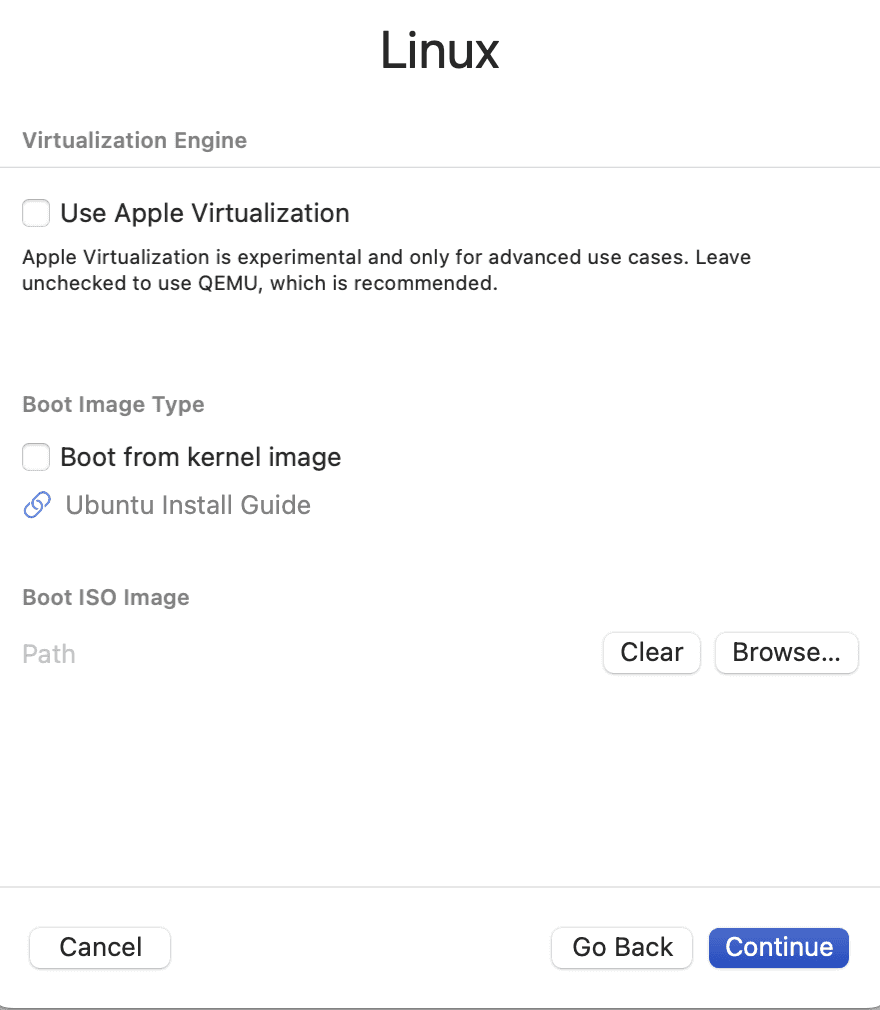
Booting Linux ISO image
Click on the Browse… next to the Boot ISO Image option and navigate to the folder where you downloaded the Linux ISO images. We’re starting with Ubuntu Desktop, so boot this image.
On the next screen, the program will ask you to configure the hardware resources for your Linux VM. The best practice is to allocate at least 2GB RAM and 50% of cores (in my care, 4 CPUs) to the virtual machine for it to function correctly.

Configuring hardware resources
Next, specify the amount of storage. The number depends on the type of Linux (Ubuntu Desktop requires at least 15GB, Alpine Virtual can do with 100MB) and your purposes: what you are going to store and do. I gave my VM 20GB.
On the next screen, click Browse… to select a folder that will be accessible to your VM.
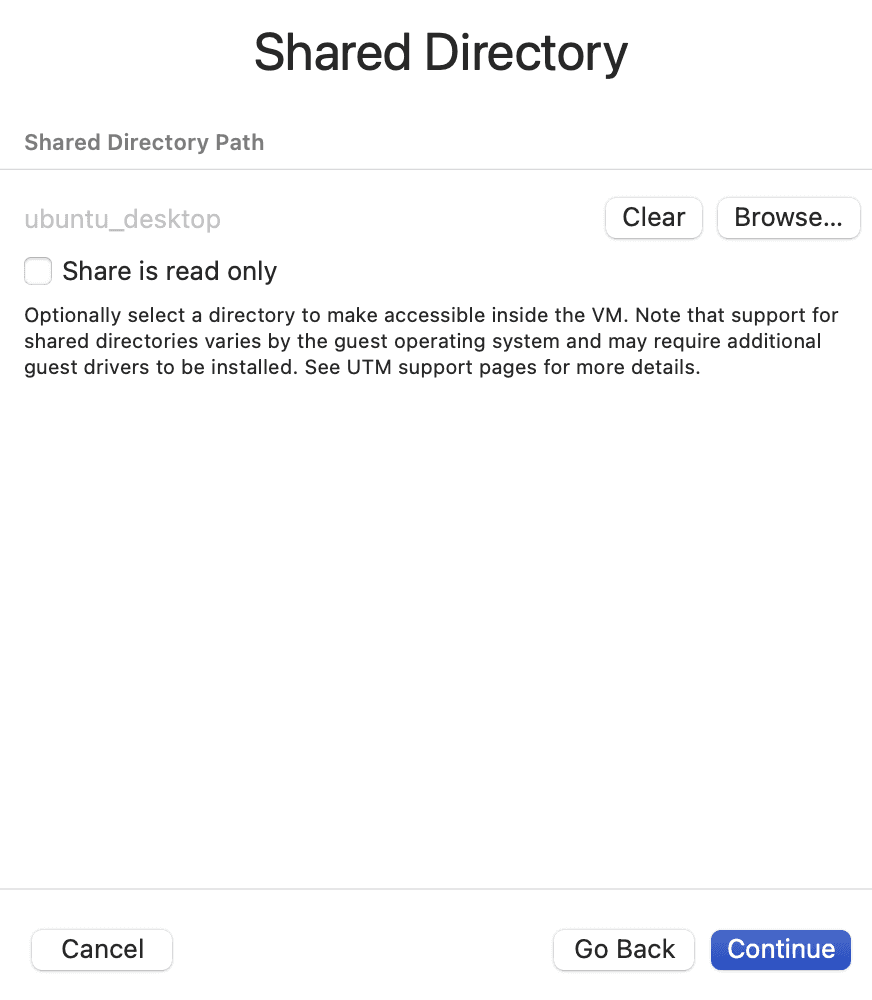
Assigning a directory for VM
The final screen provides a summary of your settings. Verify that everything is correct (you can also change the name of your VM here) and press Save.
Congratulations! You can now launch your VM.
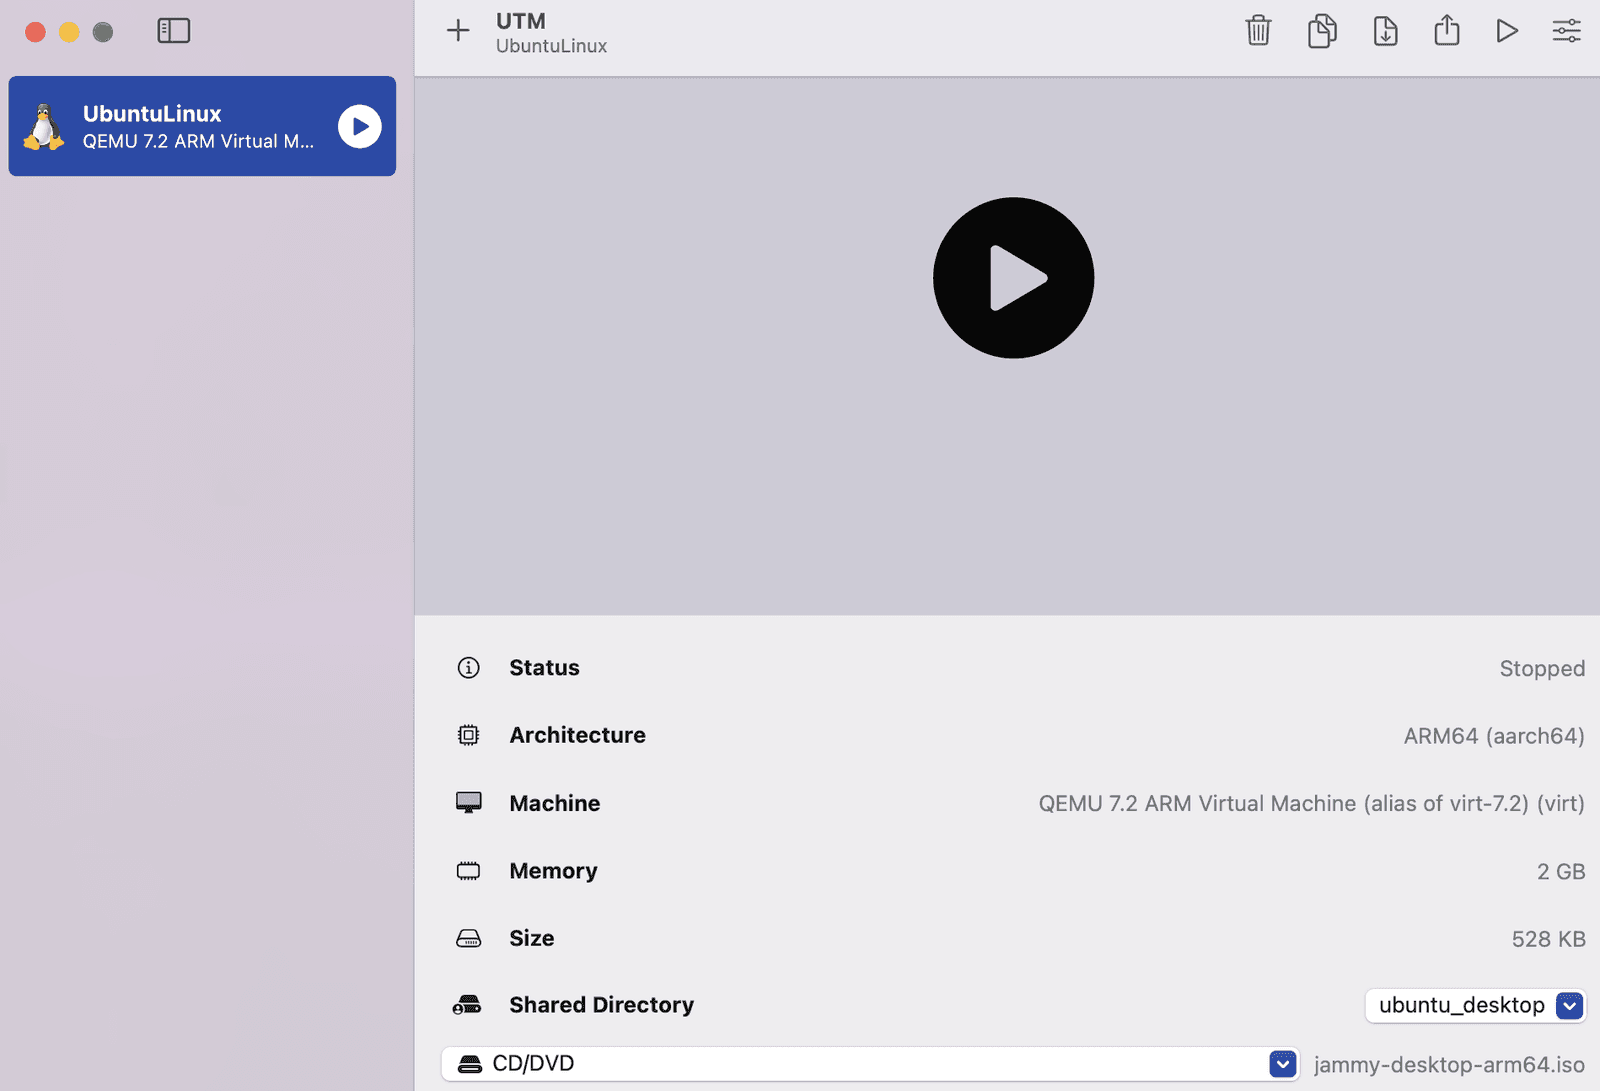
VM main page
Press the play button in the upper right corner. The VM will start, and then proceed to the usual Linux installation.
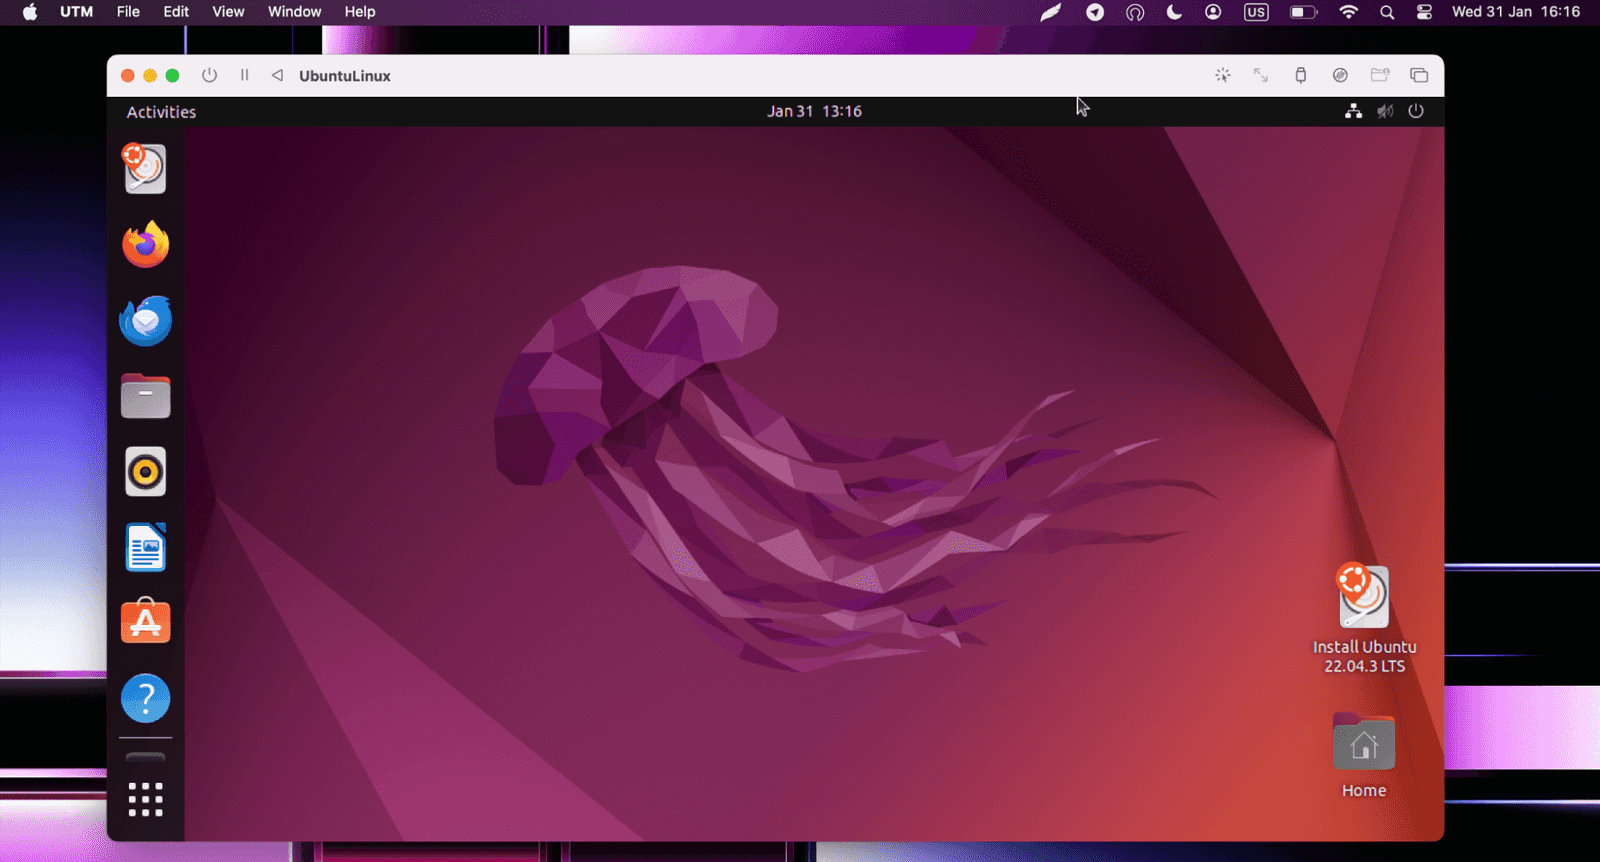
Ubuntu Desktop VM
Install Alpine Virtual
The first steps up to booting the ISO image are the same as with Ubuntu.
Let’s proceed with allocating hardware. You can give your VM the same amount you gave Ubuntu (2GB), but I’m going to work with native images. Native image compilation requires much more memory, so I would recommend allocating at least 8GB of RAM if you’d like to utilize this technology in your project. In addition, allocate four CPU Cores.
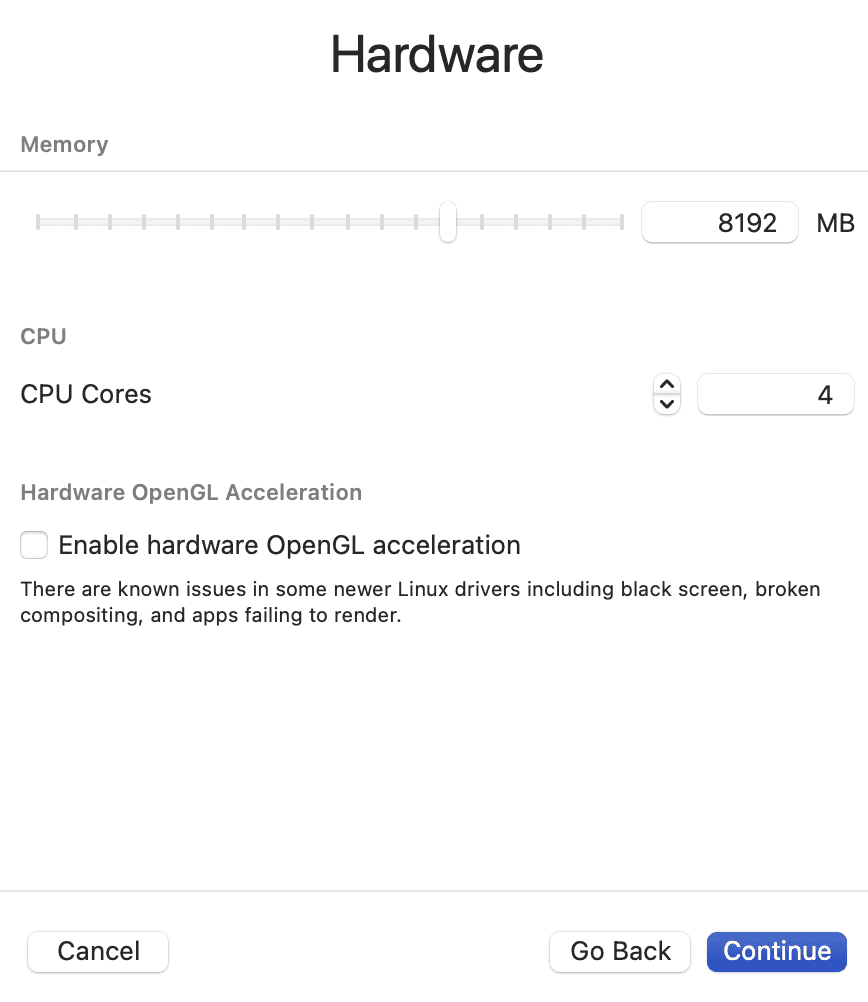
Assigning hardware resources to Server VM
As far as the storage is concerned, Alpine Virtual requires approx. 100 MB, so the actual amount of allocated disc memory depends on your needs. I gave my Alpine VM 8GB.
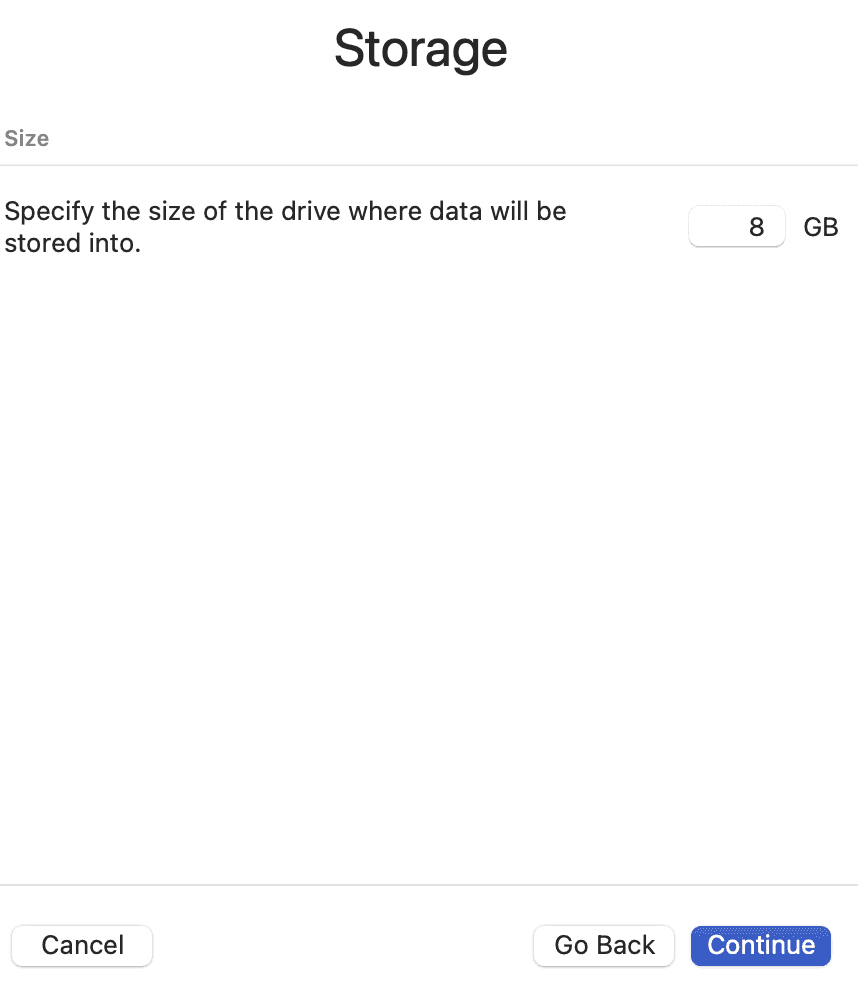
Assigning storage
Then, select a shared directory.
Verify the settings on the next screen and press Save.
After that, start your Alpine VM and proceed with the OS installation. Note that the default login for Alpine is root and the password is empty.
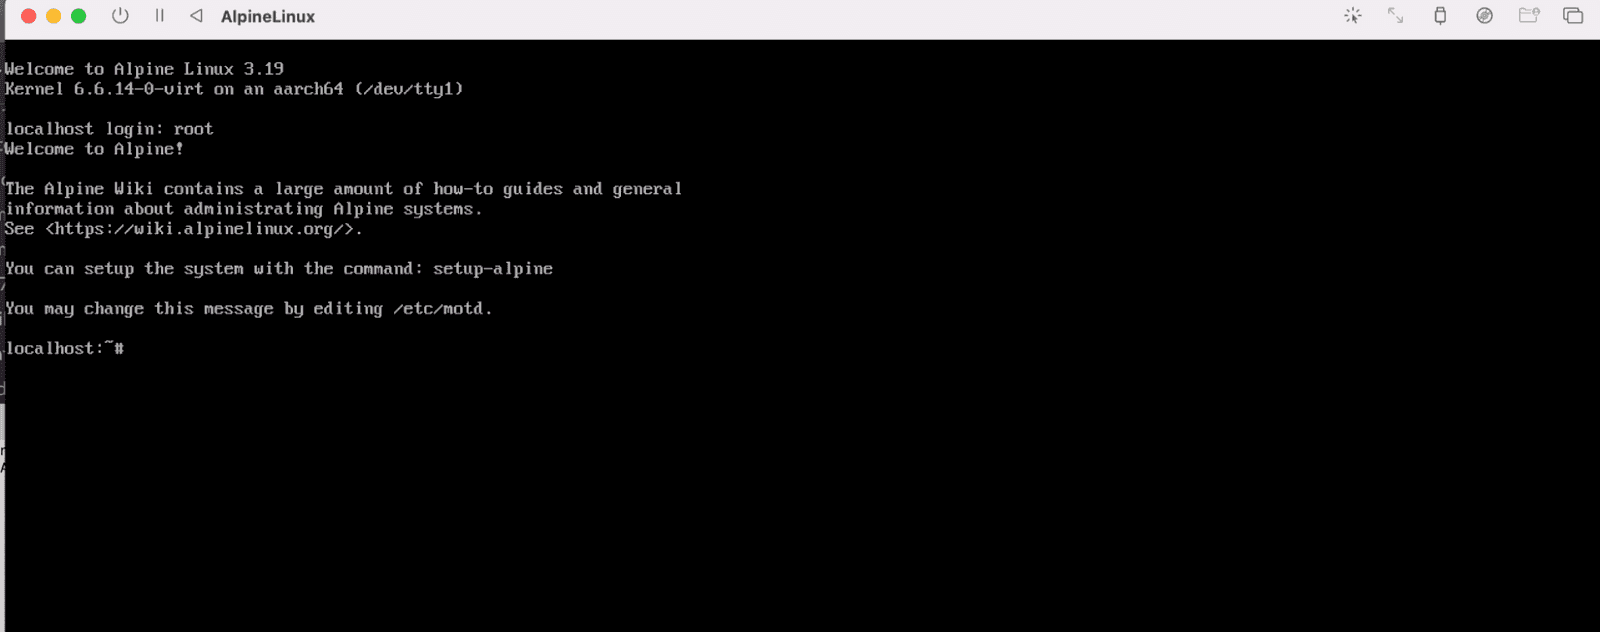
Alpine Server VM
Install Liberica JDK and Liberica Native Image Kit on Alpine Linux
After setting up the Alpine VM, you can populate it with all the tools you need. Here, I’ll provide a quick guide on installing Liberica JDK and Liberica NIK that have dedicated builds for Alpine on ARM.
Let’s start with Liberica JDK. You will require sudo, and as it is not provided with Alpine by default, install it first:
$ apk update
$ apk add sudo
Now, set up the Alpine Linux Repository and add the key:
$ echo "https://apk.bell-sw.com/main" | sudo tee -a /etc/apk/repositories
$ sudo wget -P /etc/apk/keys/ https://apk.bell-sw.com/[email protected]
Next, pull the required Liberica JDK version from the repository:
$ apk add bellsoft-java21Verify the installation by checking the JDK version:
$ java -version
openjdk version "21.0.2" 2024-01-16 LTS
OpenJDK Runtime Environment (build 21.0.2+14-LTS)
OpenJDK 64-Bit Server VM (build 21.0.2+14-LTS, mixed mode, sharing)
The next step is to install Liberica Native Image Kit. First, go to the Liberica Native Image Kit Download Center and select the version you want (there are Liberica NIK versions for JDK 17 and 21).
Next, download the .apk archive to your Alpine VM:
$ wget https://download.bell-sw.com/vm/23.1.2/bellsoft-liberica-vm-core-openjdk21.0.2+14-23.1.2+1-linux-aarch64-musl.apkAs we have already added the public key when setting up Liberica JDK, you can proceed with installing the Liberica NIK package with
$ sudo apk add ./bellsoft-liberica-vm-core-openjdk21.0.2+14-23.1.2+1-linux-aarch64-musl.apkAfter that, check the path to the NIK installation:
$ apk info -L bellsoft-liberica-vm-core-openjdk21
bellsoft-liberica-vm-core-openjdk21-23.1.2-r0 contains:
opt/bellsoft/liberica-vm-core-23.1.2-openjdk21/LICENSE_NATIVEIMAGE.txt
opt/bellsoft/liberica-vm-core-23.1.2-openjdk21/release
opt/bellsoft/liberica-vm-core-23.1.2-openjdk21/readme.txt
opt/bellsoft/liberica-vm-core-23.1.2-openjdk21/LICENSE
…
Finally, you can set the environmental variable:
$ export NIK_HOME=opt/bellsoft/liberica-vm-core-23.1.2-openjdk21Conclusion
That’s it, you are all set to work with Linux on Apple Silicon! Try experimenting with Coordinated Restore at Checkpoint accessible only to Linux users, or generate native images without any inconvenience. Happy coding!


