Introduction
This guide describes how to install the Liberica product on Microsoft Windows, Linux, and macOS computers. The type of installation you choose depends on your requirements and the platform you use.
There are several Liberica distribution variants:
- JDK Standard — use it to run, compile, and debug applications or create your own Java Runtime with a subset of Java modules;
- JDK Full — includes LibericaFX and an extended set of VMs;
- JDK Lite — install it if you are looking for a smaller footprint, yet fully functional JDK;
- JRE Standard — use it to run Java applications;
- JRE Full — includes LibericaFX and an extended set of VMs.
You can download Liberica from either the Liberica JDK Download Center or, as a support-plan customer, via a link on the support portal. After you log in to the support portal, you can see a direct link to the version of Liberica product you requested under Technologies. If you use the Liberica Download Center page, scroll down and select the OS, package type, and the distribution variant (JDK/JRE). After the download is completed, you can verify the downloaded file by comparing its size on your drive to the size on the Downloads page.
You can also use the command line to download the necessary installation packages as described further in this document.
Choose the OS below for specific installation instructions. Note that Liberica JDK is used for all examples below, but you can substitute it with Liberica JRE if necessary.
Microsoft Windows
Installing Liberica JDK using .msi file
-
Double click the Windows installation file you downloaded to run the installer. This opens the Liberica JDK Setup Wizard.
-
Click 'Next' on the Welcome screen.
-
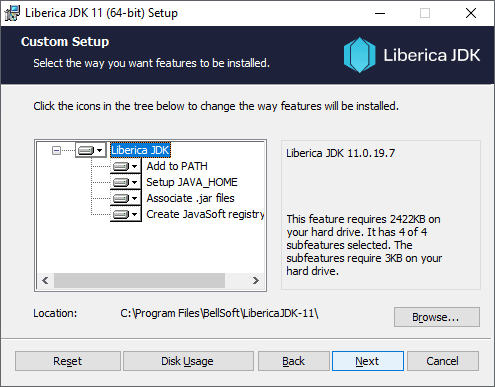
On the Custom Setup window, choose features you need. Select a feature to see its description. In most cases, you can use the default setup. Click Disk Usage to see the available and required space on your disk. Click 'Next'.
-
The package is ready to install, press 'Install'. If you see the User Account Control warning, verify the publisher (BELLSOFT) and click Yes.
-
After the installation is complete, click 'Finish' to quit the Liberica JDK Setup Wizard.
Note
The installer screens above may vary in different releases.
Silent installation using .msi file
If you want to install Liberica JDK silently without any user interaction, open the command line and run the following command:
msiexec /i bellsoft-jdk11.0.19+7-windows-amd64.msi /qn /quiet /norestart /l*v "Liberica_install.log"Where
/i- install the specified software;/qn- no UI;/quiet- quiet mode without any user interaction;/norestart- does not restart the computer after the installation is complete;/l*v "Liberica_install.log"- verbose logging of all messages to the specified log file.
For the list of installation flags and options, run msiexec /help from the command line.
Note
Use administrator account to run the installation in silent mode.
Installing a standalone package from an archive
-
To install Liberica JDK as a standalone package on your computer, download the
.zippackage file and unpack it to a folder. You can also use Windows PowerShell to download and unpack the zip file as follows:Invoke-WebRequest "https://download.bell-sw.com/java/11.0.19+7/bellsoft-jdk11.0.19+7-windows-amd64.zip" Expand-Archive bellsoft-jdk11.0.19+7-windows-amd64.zip -DestinationPath .The commands above download the archive from the BELLSOFT public domain and unpack Liberica JDK to the current directory. If you are a support-plan customer, log in to the support portal, copy the link to the Liberica product under Technologies and paste this link to the
Invoke-WebRequestcommand above. -
Add
<Liberica JDK installation dir>/binsubdirectory to the PATH and<Liberica JDK installation dir>to the JAVA_HOME environment variables as follows.-
On the desktop or in File Explorer, right-click the Computer icon (This PC) and choose Properties on the context menu.
-
Click Advanced system settings.
-
Click Environment Variables.
-
Select 'Path' in System variables and click Edit.
-
Click New and type the path to the /bin subdirectory, for example:
C:/LibericaJDK8/bin/Click OK when finished.
-
Select 'JAVA_HOME' in System variables and click Edit.
-
Delete the variable's current value and type the path to the
<Liberica JDK installation dir>subdirectory.Note
If you do not have the JAVA_HOME variable, click New under System variables and type JAVA_HOME in Variable name and type the path in Variable value.
-
Click OK in open dialog boxes to save the changes and reopen Command prompt window for the changes to take effect.
-
To run your application, use the following command:
java -jar <your_application.jar>Verifying your installation
To verify your installation, open a command-line interface, such as PowerShell or cmd, and run the following command:
java -versionYou should see an output similar to the following:
openjdk version "11.0.19" 2023-01-17 LTS
OpenJDK Runtime Environment (build 11.0.19+7-LTS)
OpenJDK 64-Bit Server VM (build 11.0.19+7-LTS, mixed mode, sharing)
Uninstalling Liberica JDK
Windows installer
If you installed Liberica JDK using Windows installation file (.msi), use the following procedure:
-
From the Windows Control Panel, open Programs > Programs and Features and select Liberica package you want to remove.
-
Click Uninstall.
Standalone package
To uninstall a standalone Liberica JDK package, remove its directory and related environmental variables in the Environment Variables dialog box.
Apple macOS
Installing Liberica JDK
To install Liberica JDK, perform the following:
-
Run the installer by double-clicking the
.dmgfile you downloaded. -
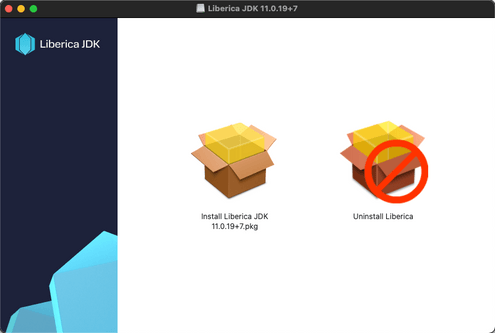
Double-click the Install Liberica JDK pkg icon to run the installation wizard.
-
Click Continue on the Welcome screen.
-
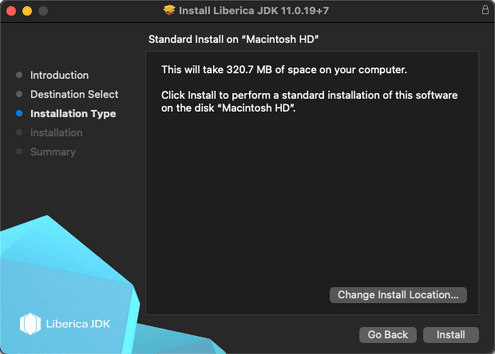
Click 'Install' to proceed with the default location.
Optionally, you can change the install location by clicking 'Change Install Location' on the Installation Type screen and selecting the location to install Liberica JDK.
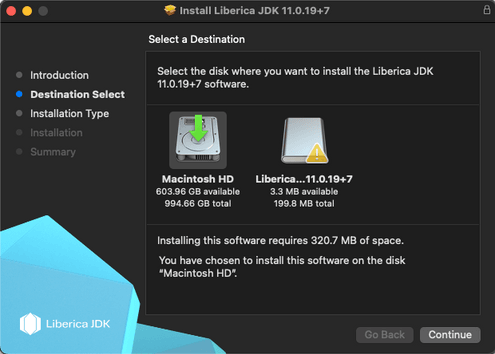
If you chose to change the install location, select the destination drive and click 'Continue'.
-
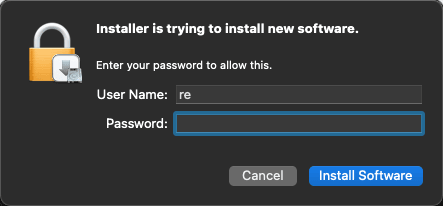
Confirm new software installation. The file copying starts immediately.
-
Observe the installation progress.
-
Once the installation is complete, click 'Close' to quit the installation wizard.
Installing a standalone package from an archive
To install Liberica JDK as a standalone package, download the .zip file and unpack it as in the following example.
wget https://download.bell-sw.com/java/11.0.19+7/bellsoft-jdk11.0.19+7-macos-amd64.zip
unzip bellsoft-jdk11.0.19+7-macos-amd64.zip
The commands above download the archive from the BELLSOFT public domain and unpack Liberica JDK to the current directory. If you are a support-plan customer, log in to the support portal, copy the link to the Liberica product under Technologies and paste this link to the wget command above.
Include the path to the <Liberica installation dir>/bin subdirectory when running your Java application as in the following example:
/Library/Java/JavaVirtualMachines/liberica-jdk-11.0.19/bin/java -jar $your_appYou can add the <Liberica installation dir>/bin subdirectory to the $PATH and <Liberica installation dir> to the JAVA_HOME environment variables for the current terminal session if necessary
export PATH=<Liberica installation dir>/bin:$PATH
export JAVA_HOME=<Liberica installation dir>
and run Liberica JDK as follows.
java -jar $your_appVerifying your installation
To verify your installation, open the terminal and run the following command:
java -versionYou should see an output similar to the following:
openjdk version "11.0.19" 2023-04-19 LTS
OpenJDK Runtime Environment (build 11.0.19+7-LTS)
OpenJDK 64-Bit Server VM (build 11.0.19+7-LTS, mixed mode, sharing)
Uninstalling Liberica JDK
Package installer
To uninstall Liberica JDK using the package installer, perform the following:
-
Run the installer by double-clicking the
.dmgfile you downloaded. -
Double-click the Uninstall Liberica.app icon.
-
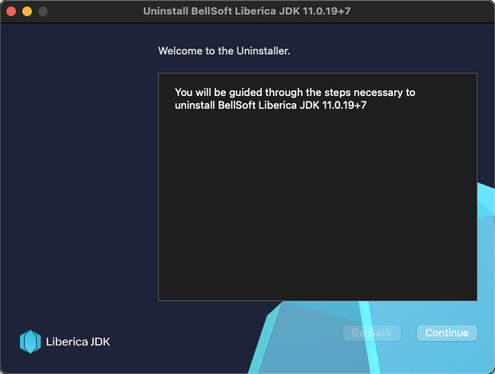
Click 'Continue' on the Welcome screen.
-
Select the Liberica installation you want to remove and click Continue.
-
Provide authentication information if necessary and click OK. Once the uninstallation is completed, click Exit to quit the wizard.
Command line
To uninstall Liberica application using the Terminal, do the following (assuming that you installed Liberica using the default location on the boot volume (/)).
-
To uninstall Liberica JRE, run the following commands in the terminal:
sudo pkgutil --volume / --forget com.bell-sw.liberica.jre.11.0.19 sudo rm -rf /Library/Java/JavaVirtualMachines/liberica-jre-11.0.19 -
To uninstall Liberica JDK, run the following commands in the terminal:
sudo pkgutil --volume / --forget com.bell-sw.liberica.jdk.11.0.19
sudo rm -rf /Library/Java/JavaVirtualMachines/liberica-jdk-11.0.19
Note
For Liberica JDK lite or full versions add -lite or -full respectively to the name, such as liberica-jdk-11.0.19-full.
Standalone package
To uninstall a standalone Liberica JDK package, remove its directory. Related environment variables set with the export command are only valid for the current terminal session and they are removed once you close the terminal.
Linux
On most Linux versions, you can install new software using a repository, which is a storage location hosted on remote servers from which the system retrieves and installs software and updates. If the repository is not available or due to some other considerations, you can download and install new software manually.
Installing from repository
Alpine Linux Repository
To install Liberica JDK, perform the following.
-
Setup the repository.
echo "https://apk.bell-sw.com/main" | sudo tee -a /etc/apk/repositories
sudo wget -P /etc/apk/keys/ https://apk.bell-sw.com/[email protected]
Note
sudo command may require entering administrator password.
-
Install packages.
apk add bellsoft-java11
The following packages are available:
- bellsoft-java11 contains the optimal build for most desktops/servers;
- bellsoft-java11-lite includes Liberica JDK with compressed modules and Server VM, without any extra packages;
- bellsoft-java11-runtime includes Liberica JRE only.
APT Repository (.deb-based Linux distributions)
To install Liberica JDK, perform the following.
-
Add BELLSOFT official GPG key and set up the repository. Adding the GPG key is required only once on a computer.
wget -q -O - https://download.bell-sw.com/pki/GPG-KEY-bellsoft | sudo apt-key add -
echo "deb https://apt.bell-sw.com/ stable main" | sudo tee
/etc/apt/sources.list.d/bellsoft.list
Liberica JDK repositories contain all Linux architectures supported in the release: amd64, i386, arm64, armhf, ppc64le.
-
Update repositories and install packages. Type
Yif a warning message about the installed packages appears.sudo apt-get update sudo apt-get install bellsoft-java11
The following packages are available:
- bellsoft-java11 contains the optimal build for most desktops/servers;
- bellsoft-java11-lite includes Liberica JDK with compressed modules and Server VM, without any extra packages;
- bellsoft-java11-full contains the full Liberica JDK, including JavaFX and a variety of JVMs for platforms which support it;
- bellsoft-java11-runtime includes Liberica JRE only.
YUM Repository (.rpm-based Linux Distributions)
To install Liberica JDK, perform the following.
-
Set up the repository.
echo | sudo tee /etc/yum.repos.d/bellsoft.repo > /dev/null << EOF
[BELLSOFT]
name=BELLSOFT Repository
baseurl=https://yum.bell-sw.com
enabled=1
gpgcheck=1
gpgkey=https://download.bell-sw.com/pki/GPG-KEY-bellsoft
priority=1
EOF
Liberica JDK repositories contain all Linux architectures supported in the release.
-
Update repositories and install packages.
sudo yum update
sudo yum install bellsoft-java11
The following packages are available:
- bellsoft-java11 contains the optimal build for most desktops/servers;
- bellsoft-java11-lite includes Liberica JDK with compressed modules and Server VM, without any extra packages;
- bellsoft-java11-full contains the full Liberica JDK, including JavaFX and a variety of JVMs for platforms which support it;
- bellsoft-java11-runtime includes Liberica JRE only.
YaST/Zypper Repository (SUSE Linux)
To install Liberica JDK, perform the following.
-
Set up the repository.
echo | sudo tee /etc/zypp/repos.d/repo-bellsoft.repo > /dev/null << EOF [BELLSOFT] name=BELLSOFT Repository baseurl=https://yum.bell-sw.com enabled=1 gpgcheck=1 gpgkey=https://download.bell-sw.com/pki/GPG-KEY-bellsoft priority=1 EOF -
Update repositories and install packages.
sudo zypper up
sudo zypper in bellsoft-java11
The following packages are available:
- bellsoft-java11 contains the optimal build for most desktops/servers;
- bellsoft-java11-lite includes Liberica JDK with compressed modules and Server VM, without any extra packages;
- bellsoft-java11-full contains the full Liberica JDK, including JavaFX and a variety of JVMs for platforms that support it;
- bellsoft-java11-runtime includes Liberica JRE only.
Manual installation
Alpine Linux
-
Download the .apk package with the following command in the terminal.
wget https://download.bell-sw.com/java/11.0.19+7/bellsoft-jdk11.0.19+7-linux-x64-musl.apkOr open the downloads page in the browser, scroll down, and download the required package.
-
Install this package with the following command.
apk add --allow-untrusted bellsoft-jdk11.0.19+7-linux-x64-musl.apk
Ubuntu and other DEB-based OS's
-
To install Liberica JDK, download the .deb package using the 'wget' command in the command-line interface.
wget https://download.bell-sw.com/java/11.0.19+7/bellsoft-jdk11.0.19+7-linux-amd64.debOr open the downloads page in the browser, scroll down, and download the required package.
-
Run the 'apt' tool as follows.
sudo apt install ./bellsoft-jdk11.0.19+7-linux-amd64.deb
To use Liberica JDK, run the following command.
java -jar $your_appRed Hat Linux and other RPM-based OS's
To install Liberica JDK, download the .rpm package and run the rpm tool as in the following example.
wget https://download.bell-sw.com/java/11.0.19+7/bellsoft-jdk11.0.19+7-linux-amd64.rpm
sudo yum install ./bellsoft-jdk11.0.19+7-linux-amd64.rpm
The commands above install Liberica JDK 11 package.
To use Liberica JDK, run the following command.
java -jar $your_appManual RPM installation
-
Obtain BELLSOFT official GPG key and then import it as in the following example. Adding the GPG key is required only once on a computer.
wget -q -O - https://download.bell-sw.com/pki/GPG-KEY-bellsoft sudo rpm --import GPG-KEY-bellsoft -
Download a package using the 'wget' command and install it as follows in the terminal.
wget https://download.bell-sw.com/java/11.0.19+7/bellsoft-jdk11.0.19+7-linux-amd64.rpm
sudo rpm --install bellsoft-jdk11.0.19+7-linux-amd64.rpm
Installing standalone JDK package on GNU/Linux
To install Liberica JDK, download the .tar.gz package and unpack it as follows.
wget https://download.bell-sw.com/java/11.0.19+7/bellsoft-jdk11.0.19+7-linux-amd64.tar.gz
tar -zxvf bellsoft-jdk11.0.19+7-linux-amd64.tar.gz
The commands above unpack Liberica JDK to the current directory. To run your Java application, use the following command:
<Liberica installation dir>/bin/java -jar $your_appYou can add the <Liberica installation dir>/bin subdirectory to $PATH and <Liberica installation dir> to JAVA_HOME for the current terminal session if necessary.
export PATH=<Liberica installation dir>/bin:$PATH
export JAVA_HOME=<Liberica installation dir>
After that run your Java application as follows.
java -jar $your_appVerifying your installation
To verify your installation, open a terminal and run the following command.
java -versionYou should see an output similar to the following:
openjdk version "11.0.19" 2023-01-17 LTS
OpenJDK Runtime Environment (build 11.0.19+7-LTS)
OpenJDK 64-Bit Server VM (build 11.0.19+7-LTS, mixed mode, sharing)
Uninstalling Liberica JDK
Alpine Linux
Run the following command.
sudo apk del <bellsoft-package-name>Ubuntu and other DEB-based OS's
Run the following command.
sudo apt remove <bellsoft-package-name>Red Hat Linux and other RPM-based OS's
Run the following command.
sudo yum remove <bellsoft-package-name>Removing manually installed standalone packages
To uninstall a standalone Liberica JDK package, remove its directory. Related environment variables are only valid for the current terminal session and they are removed once you close the terminal.
Solaris
Installing standalone package on Solaris
To install Liberica JDK, download the .tar.gz package and unpack it as follows.
wget https://download.bell-sw.com/java/11.0.19+7/bellsoft-jdk11.0.19+7-solaris-x64.tar.gz
tar -zxvf bellsoft-jdk11.0.19+7-solaris-x64.tar.gz
The commands above unpack Liberica JDK to the current directory. Either add the <Liberica installation dir>/bin subdirectory to $PATH, or set up the path to this directory as $LIBERICA_DIR environment variable and run Liberica JDK as follows.
$LIBERICA_DIR/bin/java -jar $your_appTo uninstall Liberica JDK, remove its directory and related environmental variables.
Verifying downloaded files
It is a good practice to verify the downloaded installation file by comparing its size on your drive to the size on the Downloads page.
A more advanced approach is to obtain the checksum of the downloaded file in a command-line interface and compare it to the one you can find next to the Liberica JDK link on the Downloads page. Check the OS-specific commands below.
Windows
To get the checksum of the downloaded file in the command-line, run the following command in Windows PowerShell. To run PowerShell, open the Start menu or press the Windows key + R, type powershell in the Run dialog box, and click OK.
(Get-FileHash .\bellsoft-jdk11.0.19+7-windows-amd64.msi -Algorithm SHA1).HashApple macOS
To get the checksum of the downloaded file, use the following command.
shasum -a 1 bellsoft-jdk11.0.19+7-macos-amd64.dmgLinux
To get the checksum of the downloaded file, use the following command. The installation file extension depends on the Linux version.
shasum -a 1 bellsoft-jdk11.0.19+7-linux-amd64.apkTroubleshooting
This segment provides instructions to resolve some of the most common installation issues.
Checking system requirements
The JDK code can run on a number of platforms, using different compilers and build tools. We recommend checking your system compatibility and requirements on the Supported System Configurations page before installing Liberica product.
Microsoft Defender SmartScreen warnings
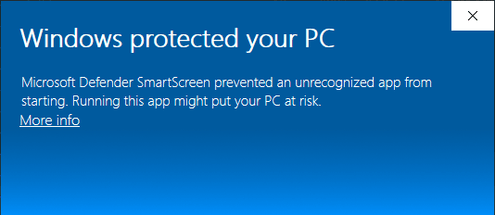
To ensure the security of the user's computer, Microsoft Defender SmartScreen sometimes prevents running the downloaded files and triggers warnings while installing software.
If Microsoft Defender SmartScreen prevents installing the Liberica product and shows a message similar to the one below, follow the instructions in this section.
-
Verify the downloaded Liberica installation file as described in Verifying downloaded files.
-
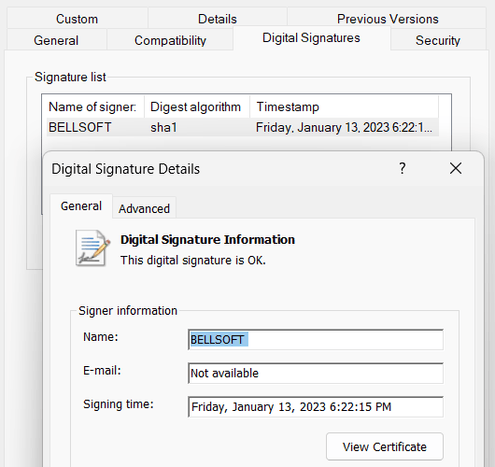
Ensure that the installation file is signed by BELLSOFT by checking the details of the Digital Signatures in the Liberica installation file Properties.
-
Depending on the verification results, do the following:
- If the size and checksum of the downloaded file matches those on the Downloads page and the file is signed by BELLSOFT, click More info on the Microsoft Defender SmartScreen window and then click Run anyway.
- If any of the verified information is not correct, delete the file and download the Liberica installation file again.
Downloading Liberica using Edge
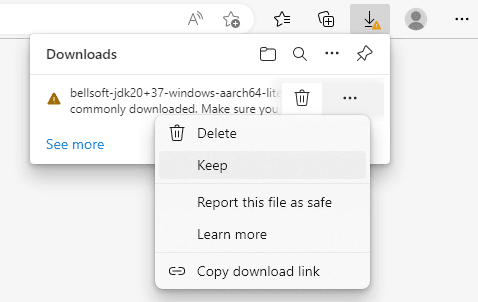
If the Edge browser prevents saving the downloaded Liberica installation file, click More actions next to the downloaded file and select Keep to save the file.
Silent installation on Windows
If after running a silent installation the software is not installed, check your log file for error messages. If the issue is the lack of administrator rights of the account running the installation, the log should contain a message similar to the following:
Error 1925. You do not have sufficient privileges to complete this installation for all users of the machine. Log on as administrator and then retry this installation.Make sure you use administrator account for running silent installation.
Reverting to a previous Liberica product version on Windows
Important
We do not recommend installing previous versions of Liberica products, because they may contain security issues resolved in the latest release.
If you have the latest version of a Liberica product installed and need to install some previous version of exactly the same product, first uninstall the current version and after that, install the version you need.
Off-screen rendering
Containerized deployments sometimes do some off-screen rendering, such as when preparing documents, forms, and images. When performing off-screen rendering, the JDK requires OS fonts and fontconfig libraries to be installed. In case these libraries or fonts are absent, you can encounter an exception similar to the one below:
Caused by: java.lang.NullPointerException
	at java.desktop/sun.awt.FontConfiguration.getVersion(FontConfiguration.java:1264)
	at java.desktop/sun.awt.FontConfiguration.readFontConfigFile(FontConfiguration.java:225)
	at java.desktop/sun.awt.FontConfiguration.init(FontConfiguration.java:107)
	at java.desktop/sun.awt.X11FontManager.createFontConfiguration(X11FontManager.java:719)
	at java.desktop/sun.font.SunFontManager$2.run(SunFontManager.java:379)
	at java.base/java.security.AccessController.doPrivileged(Native Method)
	at java.desktop/sun.font.SunFontManager.<init>(SunFontManager.java:324)
	at java.desktop/sun.awt.FcFontManager.<init>(FcFontManager.java:35)
	at java.desktop/sun.awt.X11FontManager.<init>(X11FontManager.java:56)
On Linux systems, these libraries are provided by fontconfig and font packages, and can be installed by running the following command.
- Alpine Linux:
apk add fontconfig ttf-dejavu - Ubuntu:
apt install fontconfig fonts-dejavu - Fedora:
yum install fontconfig dejavu-sans-fonts dejavu-serif-fonts - Suse:
zypper install fontconfig dejavu-fonts
To run off-screen rendering by JDK without installing the fontconfig package, do the following:
Install or copy required fonts to the system, manually edit fontconfig.properties file, and copy it to the <jdk>/lib directory.
A simple fontconfig.properties file could look like the following.
Note
Update the paths and the font names to actual paths and names of the fonts on the target system.
version=1

 serif.plain.latin-1=DejaVu Serif
 serif.bold.latin-1=DejaVu Serif Bold
 serif.italic.latin-1=DejaVu Serif Italic
 serif.bolditalic.latin-1=DejaVu Serif Bold Italic

 sansserif.plain.latin-1=DejaVu Sans
 sansserif.bold.latin-1=DejaVu Sans Bold
 sansserif.italic.latin-1=DejaVu Sans Oblique
 sansserif.bolditalic.latin-1=DejaVu Sans Bold Oblique

 monospaced.plain.latin-1=DejaVu Sans Mono
 monospaced.bold.latin-1=DejaVu Sans Mono Bold
 monospaced.italic.latin-1=DejaVu Sans Mono Oblique
 monospaced.bolditalic.latin-1=DejaVu Sans Mono Bold Oblique

 dialog.plain.latin-1=DejaVu Sans
 dialog.bold.latin-1=DejaVu Sans Bold
 dialog.italic.latin-1=DejaVu Sans Oblique
 dialog.bolditalic.latin-1=DejaVu Sans Bold Oblique

 dialoginput.plain.latin-1=DejaVu Sans Mono
 dialoginput.bold.latin-1=DejaVu Sans Mono Bold
 dialoginput.italic.latin-1=DejaVu Sans Mono Oblique
 dialoginput.bolditalic.latin-1=DejaVu Sans Mono Bold Oblique

 sequence.allfonts=latin-1

 filename.DejaVu_Sans=/usr/share/fonts/truetype/DejaVuSans.ttf
 filename.DejaVu_Sans_Bold=/usr/share/fonts/truetype/DejaVuSans-Bold.ttf
 filename.DejaVu_Sans_Bold_Oblique=/usr/share/fonts/truetype/DejaVuSans-BoldOblique.ttf
 filename.DejaVu_Sans_Mono=/usr/share/fonts/truetype/DejaVuSansMono.ttf
 filename.DejaVu_Sans_Mono_Bold=/usr/share/fonts/truetype/DejaVuSansMono-Bold.ttf
 filename.DejaVu_Sans_Mono_Bold_Oblique=/usr/share/fonts/truetype/DejaVuSansMono-BoldOblique.ttf
 filename.DejaVu_Sans_Mono_Oblique=/usr/share/fonts/truetype/DejaVuSansMono-Oblique.ttf
 filename.DejaVu_Sans_Oblique=/usr/share/fonts/truetype/DejaVuSans-Oblique.ttf
 filename.DejaVu_Serif=/usr/share/fonts/truetype/DejaVuSerif.ttf
 filename.DejaVu_Serif_Bold=/usr/share/fonts/truetype/DejaVuSerif-Bold.ttf
 filename.DejaVu_Serif_Bold_Italic=/usr/share/fonts/truetype/DejaVuSerif-BoldItalic.ttf
 filename.DejaVu_Serif_Italic=/usr/share/fonts/truetype/DejaVuSerif-Italic.ttf